The iPad Calendar Conundrum: When Your iPhone and iPad Refuse to Play Nice
Related Articles: The iPad Calendar Conundrum: When Your iPhone and iPad Refuse to Play Nice
Introduction
With enthusiasm, let’s navigate through the intriguing topic related to The iPad Calendar Conundrum: When Your iPhone and iPad Refuse to Play Nice. Let’s weave interesting information and offer fresh perspectives to the readers.
Table of Content
The iPad Calendar Conundrum: When Your iPhone and iPad Refuse to Play Nice
The seamless integration of Apple devices is a cornerstone of their appeal. The expectation is that calendars, contacts, and other crucial data will effortlessly synchronize across iPhones, iPads, Macs, and Apple Watches. However, the reality sometimes falls short. A frequently reported issue plagues many Apple users: the iPad calendar refusing to sync with the iPhone. This seemingly minor inconvenience can quickly escalate into a major productivity headache, leaving users scrambling to manage conflicting schedules and appointments across their devices. This article delves deep into the reasons behind this frustrating problem, offering a comprehensive guide to troubleshooting and resolving the iPad calendar synchronization issue.
Understanding the Synchronization Process: A Foundation for Troubleshooting
Before diving into solutions, it’s crucial to understand how calendar synchronization works within the Apple ecosystem. The process relies heavily on iCloud, Apple’s cloud storage service. When you add, edit, or delete an event on one device, iCloud acts as the central hub, updating the information across all your signed-in devices. This seamless flow depends on several factors, including:
-
iCloud Account: Both your iPhone and iPad must be signed in with the same Apple ID and have iCloud Drive enabled. This is the fundamental prerequisite for calendar synchronization. A discrepancy in Apple IDs or disabled iCloud Drive is the most common culprit.
-
Calendar Account Type: The type of calendar account you’re using (iCloud, Google Calendar, Exchange, etc.) can influence synchronization. While iCloud calendars generally sync flawlessly, third-party calendars might require specific settings or troubleshooting steps.
-
Network Connectivity: A stable internet connection is essential for data transfer between your devices and iCloud. Poor Wi-Fi or cellular data can disrupt the synchronization process, leading to inconsistencies.
-
Software Updates: Outdated iOS or iPadOS versions can contain bugs that interfere with calendar synchronization. Keeping your devices updated with the latest software is crucial for optimal performance.
-
Background App Refresh: This iOS setting allows apps to update in the background, ensuring data is refreshed even when the app isn’t actively open. Disabling background app refresh for the Calendar app can hinder synchronization.
-
Storage Space: Insufficient storage space on either your iPhone or iPad can impede the synchronization process. iCloud also has storage limits; exceeding these limits can restrict data updates.
Troubleshooting Steps: A Systematic Approach to Resolution
When your iPad calendar refuses to sync with your iPhone, a systematic approach to troubleshooting is essential. Here’s a step-by-step guide:
1. Verify iCloud Account and Settings:
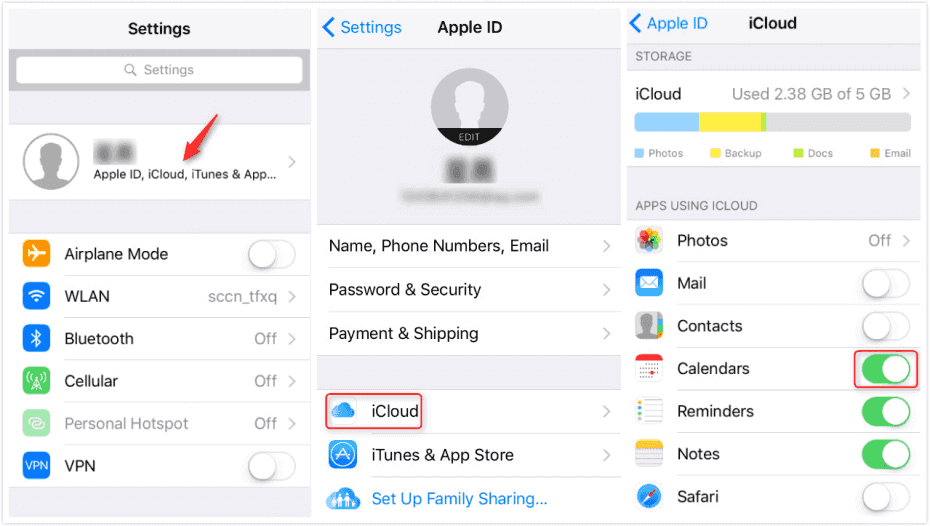
- Check Apple ID: Ensure both your iPhone and iPad are signed in with the exact same Apple ID. A seemingly minor difference in capitalization can disrupt the synchronization.
- Enable iCloud Drive: Go to Settings > [your name] > iCloud > iCloud Drive and ensure it’s toggled on for both devices.
- Enable Calendar in iCloud: In the same iCloud settings menu, verify that "Calendar" is also enabled.
2. Check Network Connectivity:
- Stable Internet Connection: Ensure both devices have a stable internet connection (Wi-Fi or cellular data). Try restarting your router or modem if necessary.
- Airplane Mode: Toggle Airplane Mode on and off to refresh the network connection.
3. Restart Your Devices:
- Force Restart: A simple restart often resolves temporary glitches. For iPhones, this involves pressing and holding the power button until the "slide to power off" slider appears. For iPads, the process varies slightly depending on the model.
- Hard Reset: If a simple restart doesn’t work, try a hard reset (force restart). This involves a specific combination of button presses that varies depending on your device model. Consult Apple’s support website for instructions specific to your device.
4. Update iOS/iPadOS:
- Check for Updates: Go to Settings > General > Software Update and install any available updates for both your iPhone and iPad. These updates often include bug fixes that can resolve synchronization problems.
5. Manage Background App Refresh:
- Enable Background App Refresh: Go to Settings > General > Background App Refresh. Ensure that the Calendar app is allowed to refresh in the background.
6. Check Storage Space:
- Free Up Space: Insufficient storage space can hinder synchronization. Delete unnecessary files and apps on both devices to free up space. Also, check your iCloud storage to ensure you haven’t exceeded your storage limit.
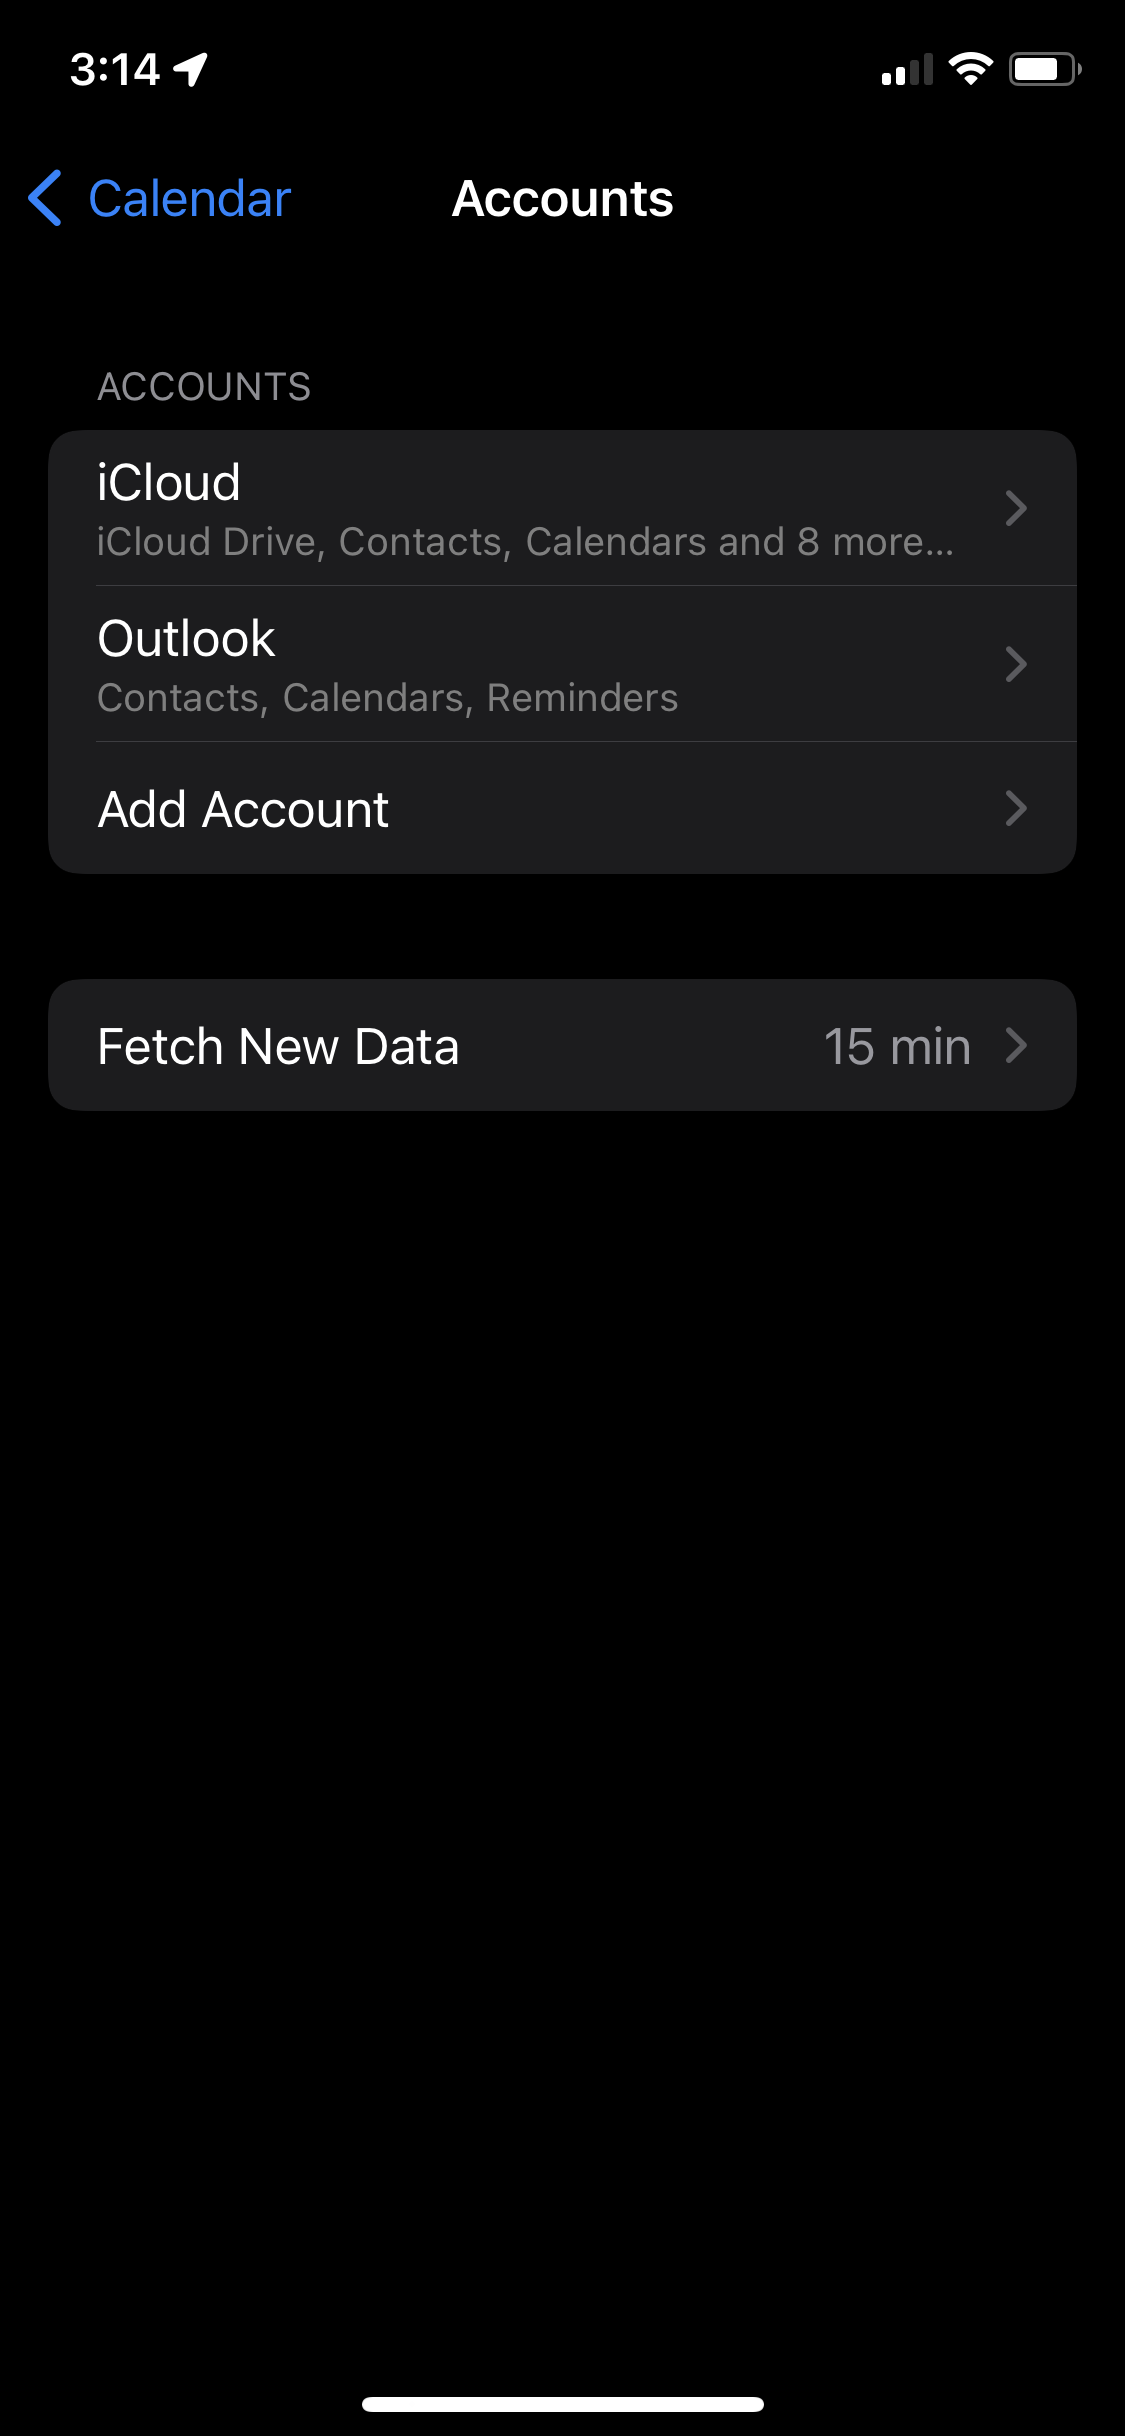
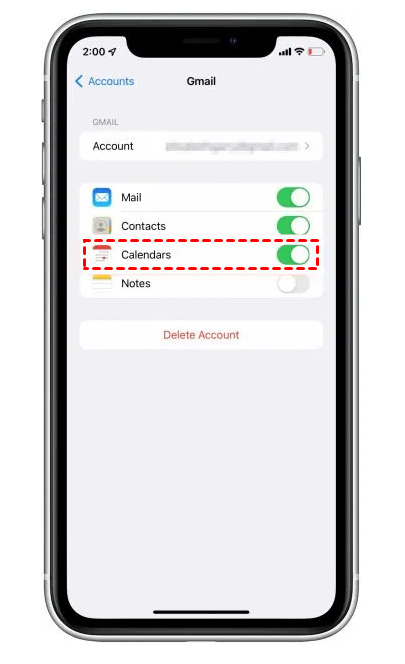
7. Review Calendar Account Settings:
- Account Type: If you’re using a third-party calendar (Google Calendar, Exchange, etc.), verify the account settings are correctly configured on both devices. Check for any authentication issues or synchronization errors.
- Calendar Subscriptions: If you’ve subscribed to external calendars, ensure they are properly configured and updated. Problems with these subscriptions can sometimes impact the main calendar sync.
8. Reset Network Settings:
- Last Resort: As a last resort, you can reset the network settings on both devices. This will erase all your Wi-Fi passwords and other network configurations, so be prepared to re-enter them. Go to Settings > General > Transfer or Reset iPhone/iPad > Reset > Reset Network Settings.
9. Contact Apple Support:
- Seek Professional Help: If none of the above steps resolve the issue, it’s time to contact Apple Support. They can provide more advanced troubleshooting steps or identify hardware or software problems requiring professional attention.
Beyond the Basics: Advanced Troubleshooting Techniques
For persistent issues, consider these advanced steps:
- Sign Out and Back In: Sign out of your iCloud account on both devices and then sign back in. This can sometimes refresh the connection and resolve synchronization problems.
- Check for Corrupted Data: In rare cases, corrupted calendar data can disrupt synchronization. You might need to delete and recreate the calendar on one or both devices. This is a drastic measure, so back up your data beforehand.
- Check for App Conflicts: Third-party calendar apps or other apps that interact with the calendar might interfere with synchronization. Try disabling or uninstalling any suspect apps temporarily to see if it resolves the issue.
Prevention is Better Than Cure: Proactive Measures
While troubleshooting is essential when problems arise, proactive measures can help prevent future synchronization issues:
- Regular Software Updates: Keep your iOS/iPadOS versions up-to-date to benefit from bug fixes and performance improvements.
- Consistent iCloud Usage: Rely on iCloud for your primary calendar data to ensure seamless synchronization.
- Regular Device Backups: Regularly back up your devices to iCloud or another backup service to safeguard your data in case of unforeseen issues.
The iPad calendar not syncing with your iPhone is a frustrating problem, but with a systematic approach and the right troubleshooting steps, you can restore seamless synchronization and regain control of your schedule. Remember to start with the simplest solutions and progress to more advanced techniques only if necessary. By understanding the synchronization process and following these steps, you can confidently navigate this common Apple device challenge.
:max_bytes(150000):strip_icc()/002-what-you-need-to-know-to-sync-iphone-to-ipad-1999222-9cb2adef42d4493a845bbb8d7cad0872-6d1037e2d64f4a2a875dfaad7b94a2f0.jpg)


![16 Solutions to Fix iPhone Calendar Not Syncing [2021]](https://www.mobikin.com/d/file/idevice/sync-icloud-calendar-manually.jpg)
Closure
Thus, we hope this article has provided valuable insights into The iPad Calendar Conundrum: When Your iPhone and iPad Refuse to Play Nice. We appreciate your attention to our article. See you in our next article!