Banishing the Calendar: A Spectacular, Breathtaking, and Splendid Guide to Removing Calendars from Your iPhone
Related Articles: Banishing the Calendar: A Spectacular, Breathtaking, and Splendid Guide to Removing Calendars from Your iPhone
Introduction
With enthusiasm, let’s navigate through the intriguing topic related to Banishing the Calendar: A Spectacular, Breathtaking, and Splendid Guide to Removing Calendars from Your iPhone. Let’s weave interesting information and offer fresh perspectives to the readers.
Table of Content
Banishing the Calendar: A Spectacular, Breathtaking, and Splendid Guide to Removing Calendars from Your iPhone
:max_bytes(150000):strip_icc()/A3-DeleteaCalendaroniPhone-annotated-d1d04a7b9b014bc8b7e53c4c063f3a24.jpg)
Your iPhone calendar, a once-helpful scheduling companion, has perhaps become cluttered, confusing, or even a source of unwanted notifications. Maybe you’ve subscribed to too many calendars, inherited unwanted shared calendars, or simply want a cleaner, more streamlined digital life. Whatever the reason, removing unwanted calendars from your iPhone is surprisingly straightforward. This comprehensive guide will walk you through every possible scenario, ensuring a spectacular, breathtaking, and splendidly organized calendar experience.
Part 1: Understanding Your iPhone Calendars
Before diving into the removal process, it’s crucial to understand the different types of calendars you might encounter on your iPhone:
-
Default Calendars: These are the calendars pre-installed on your iPhone, including your primary calendar (usually named "Calendar") and potentially others like "Birthdays." You can’t delete these, but you can significantly reduce their visibility.
-
Subscribed Calendars: These are calendars you’ve added from external sources, such as Google Calendar, Outlook Calendar, or specific event websites. You can subscribe and unsubscribe to these at will.
-
Shared Calendars: These calendars are shared with you by others. You can view and sometimes edit them, but the removal process differs depending on your access level.
-
Calendars from Apps: Some apps, like fitness trackers or productivity tools, might create their own calendars to display scheduled activities or reminders. Removing these often involves adjusting the app’s settings.
Part 2: Removing Subscribed Calendars – A Breathtakingly Simple Process
Removing subscribed calendars is the easiest aspect of this process. Here’s a step-by-step guide:
-
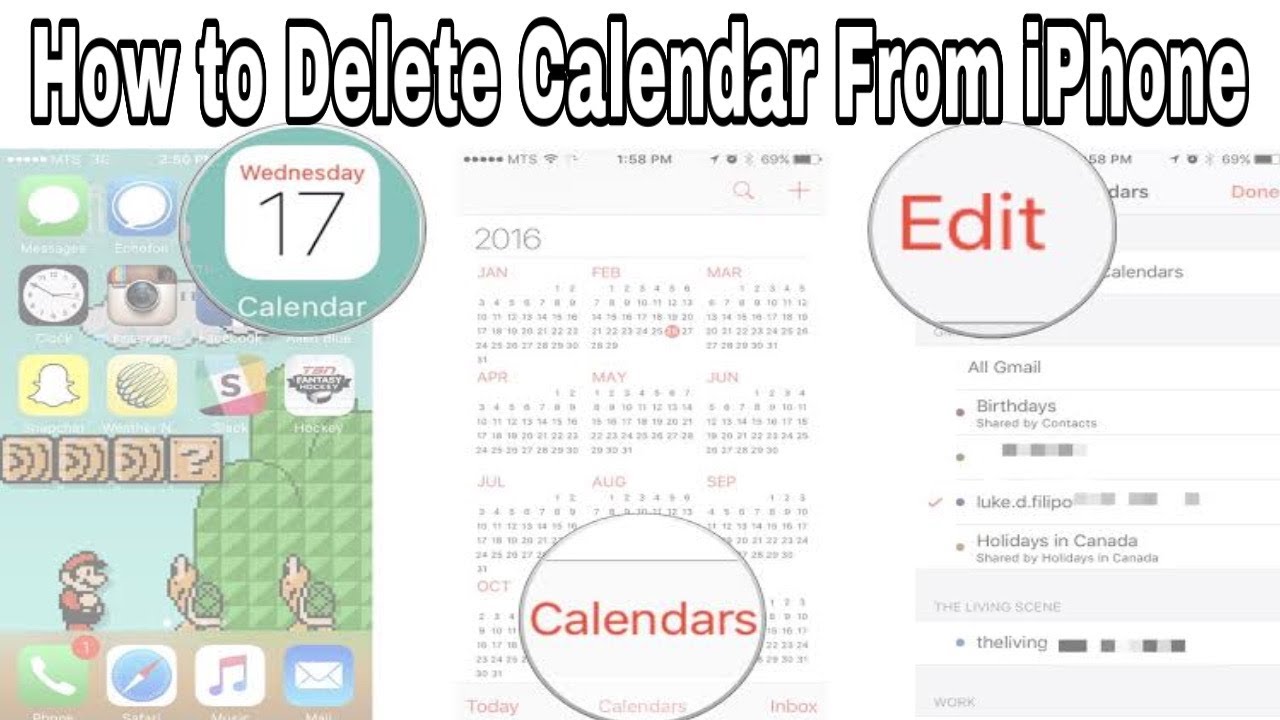
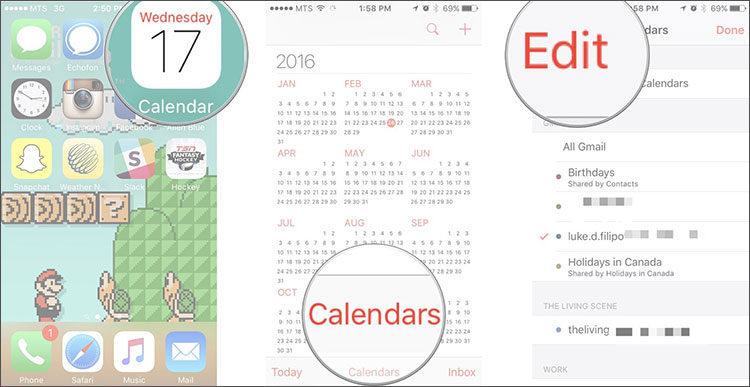
Open the Calendar App: Locate and tap the Calendar app icon on your iPhone’s home screen.
-
Navigate to Calendars: At the bottom of the screen, you’ll see a tab labeled "Calendars" (or similar). Tap it.
-
Locate the Calendar to Remove: A list of all your subscribed calendars will appear. Find the calendar you wish to remove. Note: The default calendars will also appear here, but they cannot be deleted.
-
Toggle the Calendar Off: To the right of each calendar name, you’ll see a toggle switch. Simply slide this switch to the left. The switch will turn gray, indicating the calendar is now hidden. This doesn’t delete the calendar; it simply removes it from your view.
-
Unsubscribing (for a complete removal): If you want to completely remove the calendar from your iPhone, you might need to unsubscribe from the source. This usually involves going to the app or website where you initially subscribed to the calendar and finding the option to unsubscribe or delete it. The exact steps will vary depending on the service.
Part 3: Managing Shared Calendars – A Splendidly Controlled Approach
Dealing with shared calendars requires a slightly more nuanced approach. Your ability to remove a shared calendar depends on the permissions granted to you by the calendar’s owner.
-
Identify the Shared Calendar: Within the "Calendars" section of the Calendar app, locate the shared calendar you wish to remove.
-
Assess Your Permissions: If you only have viewing permissions, you can simply hide the calendar by toggling the switch to the off position, as described in Part 2. However, if you have editing permissions, you might have more options.
-
Removing Access (if permitted): If you have editing permissions and wish to completely remove the calendar from your iPhone, you may need to contact the calendar’s owner and request that they remove your access. They can usually do this within the settings of the shared calendar on their device or through the calendar’s hosting service (like Google Calendar or Outlook).
-
Leaving the Shared Calendar (if applicable): Some calendar services provide a "Leave Calendar" option within the settings of the shared calendar. This allows you to remove yourself from the calendar without needing to contact the owner.
Part 4: Dealing with Calendars from Apps – A Precise and Efficient Method
Many apps create their own calendars to display scheduled activities. Removing these calendars usually requires adjusting the app’s settings, not directly through the iPhone’s Calendar app.
-
Identify the App: Determine which app is creating the unwanted calendar.
-
Check App Settings: Open the app and navigate to its settings. Look for options related to calendar integration, notifications, or data sharing. You should find a setting to disable or remove the app’s calendar integration.
-
Review Notifications: Within the app’s settings or your iPhone’s Notification settings, ensure that notifications from the app’s calendar are turned off.
-
Re-evaluate App Usage: If the app’s calendar is consistently unwanted, consider uninstalling the app altogether.
Part 5: Troubleshooting and Advanced Techniques
-
Calendar Still Showing After Removal: If a calendar persists after you’ve toggled it off or unsubscribed, try restarting your iPhone. This often resolves minor software glitches.
-
Multiple Accounts: If you’re using multiple accounts (e.g., personal and work), make sure you’re removing the calendar from the correct account.
-
Data Synchronization: Be aware that removing a calendar from your iPhone might not necessarily remove it from the source (e.g., your Google Calendar account). The calendar might still exist on the server, and you might need to delete it from the source as well to completely remove it.
-
Restoring Defaults: As a last resort, if you’re experiencing significant calendar issues, consider restoring your iPhone to factory settings. This should remove all calendars, but remember to back up your data beforehand. This is a drastic step and should only be considered if all other methods fail.
Part 6: A Spectacularly Organized Future
By following these steps, you can achieve a spectacularly organized and breathtakingly clean iPhone calendar experience. Remember to take your time, carefully review each calendar, and only remove those that are truly unnecessary. A splendidly managed calendar is a key component of a productive and stress-free digital life. Now go forth and conquer the clutter! Your perfectly organized calendar awaits.
![How to Delete Calendars on iPhone [Ultimate Guide]](https://www.fonelab.com/images/foneeraser/delete-iphone-calendar-event/delete-iphone-calendars-on-app.jpg)

:max_bytes(150000):strip_icc()/A5-DeleteaCalendaroniPhone-annotated-2eadb31043ce4ebfa8abf3f8a9e71910.jpg)


Closure
Thus, we hope this article has provided valuable insights into Banishing the Calendar: A Spectacular, Breathtaking, and Splendid Guide to Removing Calendars from Your iPhone. We hope you find this article informative and beneficial. See you in our next article!