Crafting an Interactive Calendar in Excel: A Comprehensive Guide
Related Articles: Crafting an Interactive Calendar in Excel: A Comprehensive Guide
Introduction
With enthusiasm, let’s navigate through the intriguing topic related to Crafting an Interactive Calendar in Excel: A Comprehensive Guide. Let’s weave interesting information and offer fresh perspectives to the readers.
Table of Content
Crafting an Interactive Calendar in Excel: A Comprehensive Guide

Excel, often perceived as a mere spreadsheet program, possesses surprising capabilities for creating dynamic and interactive tools. Among these is the ability to build a fully functional interactive calendar. This article will guide you through the process, from basic setup to advanced features, enabling you to create a calendar tailored to your specific needs. We’ll explore various techniques, from simple data validation to VBA scripting, ensuring a solution suitable for both novice and experienced Excel users.
I. Planning Your Interactive Calendar:
Before diving into Excel, meticulously plan your calendar’s functionality. Consider the following:
- Purpose: What will this calendar be used for? Scheduling appointments? Tracking projects? Managing tasks? The purpose dictates the features you’ll need.
- Data Requirements: What information needs to be displayed? Dates, times, descriptions, assigned individuals, priorities, deadlines – all need consideration.
- User Interaction: How will users interact with the calendar? Will they input data directly? Will there be filters or sorting options? Will it integrate with other Excel sheets or external data sources?
- Visual Design: While functionality is paramount, a well-designed calendar enhances usability. Think about color-coding, formatting, and overall aesthetics.
II. Basic Calendar Structure (No VBA):
For a simple interactive calendar, you can leverage Excel’s built-in features. This approach is ideal for users unfamiliar with VBA scripting.
-
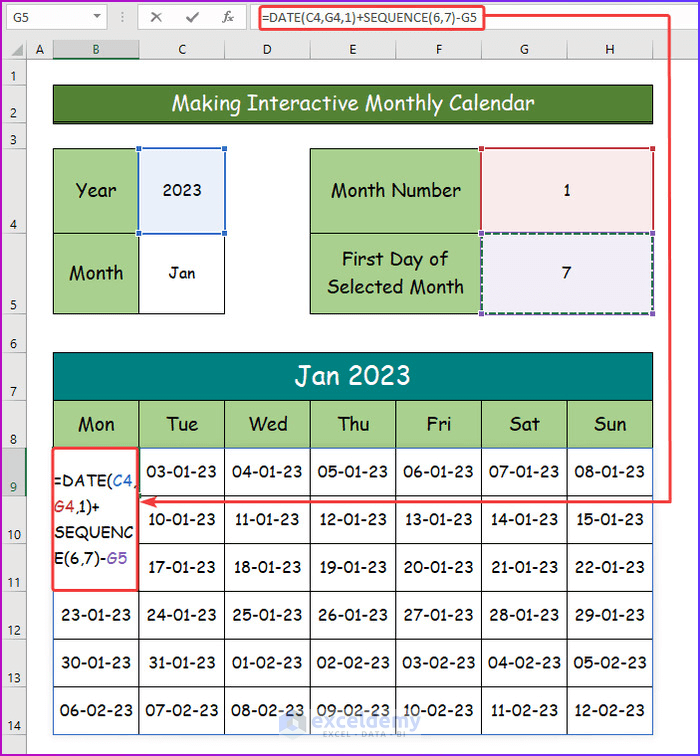
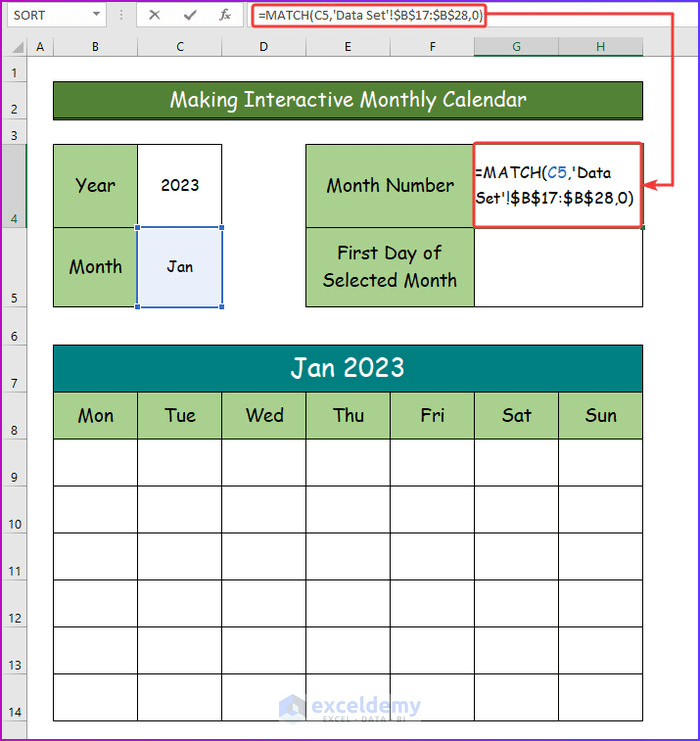
Date Setup: Create a column (e.g., Column A) for dates. You can manually input dates or use formulas to generate a series. For instance, in cell A2, enter a starting date (e.g., 01/01/2024). In cell A3, enter
=A2+1and drag this formula down to cover your desired date range. Format the column as a date to ensure consistent display. -
Data Input Columns: Add columns for the information you wish to track. This might include "Event," "Time," "Description," "Priority," "Assigned To," etc. (Columns B, C, D, E, F, etc.).
-
Data Validation (Optional): Enhance user input by implementing data validation. For instance, you can restrict the "Priority" column to a dropdown list of options (e.g., High, Medium, Low) to ensure consistency. To do this, select the "Priority" column, go to Data > Data Validation, and set the criteria accordingly.
-
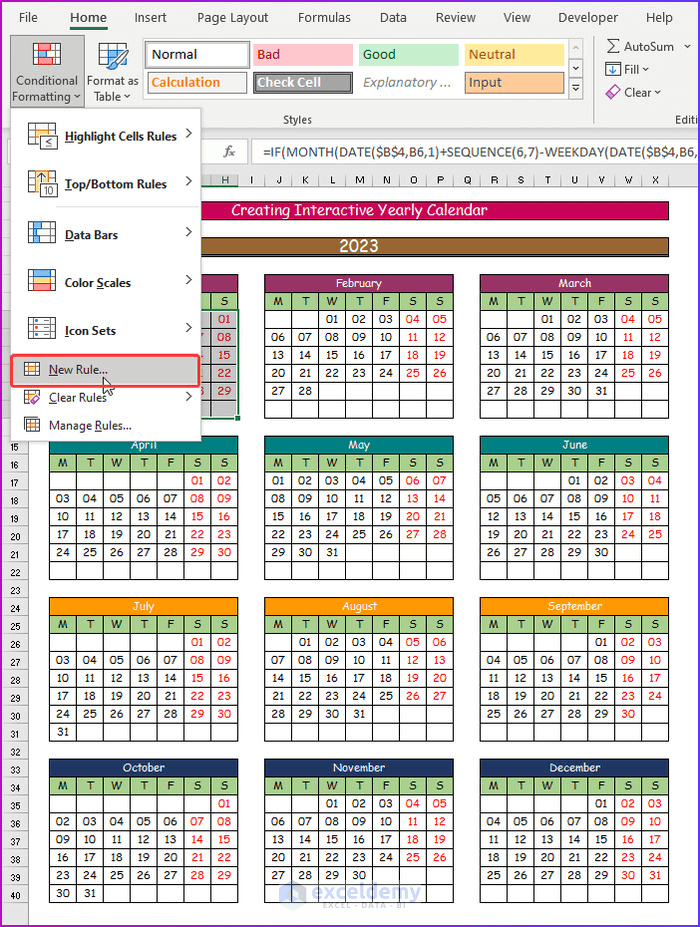
Conditional Formatting (Highly Recommended): Use conditional formatting to visually highlight important information. For example, highlight events with "High" priority in red, events in the past in gray, or upcoming deadlines in yellow. This significantly improves the calendar’s readability and usability. Access conditional formatting through Home > Conditional Formatting.
-
Filtering and Sorting: Excel’s built-in filtering and sorting capabilities allow users to easily navigate the calendar data. Select the header row, go to Data > Filter, and utilize the dropdown arrows to filter by any column. Similarly, you can sort the data by any column (Data > Sort).
III. Advanced Interactive Calendar (Using VBA):
For a truly interactive calendar with more sophisticated features, Visual Basic for Applications (VBA) is necessary. This section outlines some advanced techniques:
-
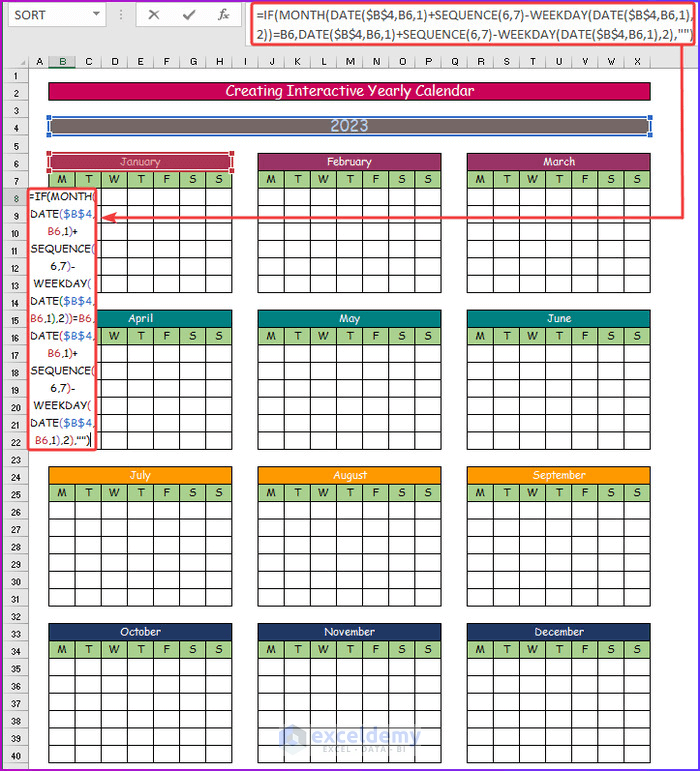
Calendar Display: Instead of a simple list, you can create a visual calendar grid using VBA. This involves dynamically generating cells and populating them with event information based on the date. This requires more advanced VBA knowledge and involves loops and cell manipulation.
-
Event Creation/Editing Forms: VBA allows you to create user-friendly forms for adding or modifying events. These forms can guide users through inputting data and ensure consistency.
-
Appointment Reminders: VBA can be used to create pop-up reminders for upcoming events. This functionality involves scheduling VBA code to run at specific times, checking for events on the specified date, and displaying a notification.
-
Integration with External Data Sources: VBA can connect your Excel calendar to external databases or other applications, automatically updating the calendar with data from other sources.
-
Customizable Views: VBA can allow users to switch between different calendar views (e.g., daily, weekly, monthly) with a click of a button. This requires careful design and coding to dynamically adjust the calendar’s display.
IV. Example VBA Code Snippet (Simple Event Entry Form):
This code creates a basic form for entering event details:
Sub AddEvent()

  Dim eventForm As UserForm
  Set eventForm = New UserForm1 ' Replace UserForm1 with your form's name

  eventForm.Show

  If eventForm.txtDate.Value <> "" Then ' Check if data was entered
    ' Add code here to write the event data to your calendar sheet
  End If

End Sub
This requires creating a UserForm in the VBA editor (Alt + F11), adding text boxes (for date, time, description, etc.), and then writing the code to handle data entry and storage. This is a simplified example; a fully functional form would require more extensive error handling and data validation.
V. Troubleshooting and Best Practices:
-
Error Handling: Always include error handling in your VBA code to prevent unexpected crashes. Use
On Error Resume NextandOn Error GoTo 0statements judiciously. - Data Validation: Implement robust data validation to ensure data accuracy and consistency.
- Comments: Add comments to your VBA code to make it easier to understand and maintain.
- Testing: Thoroughly test your interactive calendar to identify and fix bugs before deployment.
- Security: If sharing your workbook, be mindful of potential security risks associated with VBA macros.
VI. Conclusion:
Creating an interactive calendar in Excel provides a powerful way to manage your schedule and track important information. The level of interactivity depends on your needs and your proficiency with VBA. Starting with a basic calendar and gradually adding features allows you to build a customized solution that perfectly fits your workflow. Remember that meticulous planning and thorough testing are crucial for creating a robust and user-friendly interactive calendar in Excel. The journey from a simple spreadsheet to a dynamic, interactive calendar is achievable with careful planning, a systematic approach, and a willingness to explore Excel’s full potential. By mastering the techniques outlined in this article, you can transform your spreadsheet software into a personalized productivity powerhouse.


Closure
Thus, we hope this article has provided valuable insights into Crafting an Interactive Calendar in Excel: A Comprehensive Guide. We thank you for taking the time to read this article. See you in our next article!